www.flickr.com
Showing posts with label HOW?. Show all posts

Free Internet for Computers using Android or any cellphones

Tuesday, December 10, 2013 Posted by Glenn 0 comments

photo courtesy of ABS-CBN news.
Article by: Glenn Posadas

Thanks to the partnership of Globe Telecoms and Facebook, users can now access the Facebook using their Android phones or any mobile phones as long as it provides you a GPRS access.

But apparently, Globe is not smart enough to block all the websites. Wait, what? Yes, Globe can't block other sites (google, yahoo, in fact all websites!!!) unless you are using a mobile phone.

Basically, this blog post aims to tell my readers that we can now have a free internet access until January! But how?
ANSWER: By tethering our Mobile Phones to our PC/Laptop. (NOTE: I use CM Flare v1.0 )

Steps:
Simple as ABC: just make sure your account or sim card is now available to access and browse the Facebook.
Next is to tether our cellphone to our PC or laptop.
How to tether? Just find it out in Settings of your mobile phone. I don't think tethering is available in iOS. My girlfriend has an ipadMini but I can't find tethering function there.
If the tethering is successful, voila! You can now browse the web. Don't forget to share this and share your speedtest. By the way, the Download/Upload speed doesn't mean you can access or browse a certain website in just a short period of time.

Here is my speedtest result: (anyways, my classmate had 5mbps dl speed but not fast enough to open a website).


additional tags: free internet for android 2013, 2013 free internet for pc desktops, free internet for laptops, free internet using android cellphones 2013, 2013 free internet unlimited android operating system.

Sharing is so Easy:
StumpleUpon DiggIt! Del.icio.us Blinklist Yahoo Furl Technorati Simpy Spurl Reddit Google Twitter FaceBook

Labels: ,

How to compile java codes to .exe

Sunday, September 29, 2013 Posted by Glenn 0 comments

article by: Glenn Posadas
There are basically many ways to convert your Java source file (.java) or Java class file(.class) into an executable program (means double clicking then run or click+return) for windows.

By the way, I use exe4j and jar2exe ;)

One of these ways is by using a software that will convert your source codes into .exe file.
Example of converters you can use:

1. JSmooth
JSmooth is a Java Executable Wrapper. It creates native Windows launchers (standard .exe) for your java applications. It makes java deployment much smoother and user-friendly, as it is able to find any installed Java VM by itself.

Download: CLICK HERE (sourceforge)


2. Launch4j
Launch4j is a cross-platform tool for wrapping Java applications distributed as jars in lightweight Windows native executables. The executable can be configured to search for a certain JRE version or use a bundled one, and it's possible to set runtime options, like the initial/max heap size. The wrapper also provides better user experience through an application icon, a native pre-JRE splash screen, and a Java download page in case the appropriate JRE cannot be found.

Download: CLICK HERE (sourceforge)

3. JexePack
JexePack is a command line tool (great for automated scripting) that allows you to package your Java application (class files), optionally along with its resources (like GIF/JPG/TXT/etc), into a single compressed 32-bit Windows EXE, which runs using Sun's Java Runtime Environment. Both console and windowed applications are supported.

4. exe4j
exe4j is a Java exe maker that helps you integrate your Java applications into the Windows operating environment, whether they are service, GUI or command line applications.

Download: CLICK HERE

5. jartoExe1.8
Jar2Exe is a tool to convert jar files into exe files.

Download: CLICK HERE

Example:
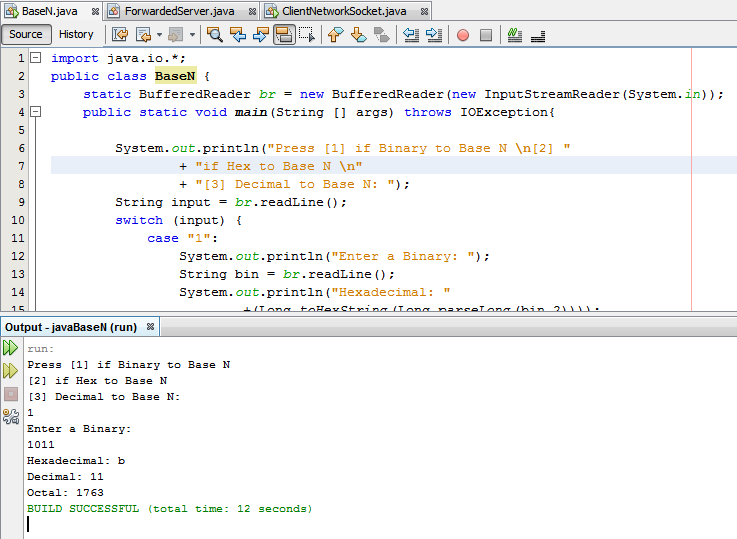
Let us convert this java code to .exe program


OUTPUT (in exe):


Please note that you have to locate your JAR file generated by your IDE/JAVA compiler.
In netbeans, right click the project > properties > Packaging > check the "compress jar file".
Jar file will be under your Dist folder.

(3PM, no lunch yet :( damn Java, I almost forgot how to wrap jar to .exe )

additional tags: If I have a Java source file (.java) or class file (.class). How can I convert it to an .exe file?, compile to exe java, java to exe, java to executable for windows, java to program for windows, conver all java codes to .exe form

Sharing is so Easy:
StumpleUpon DiggIt! Del.icio.us Blinklist Yahoo Furl Technorati Simpy Spurl Reddit Google Twitter FaceBook

Labels: ,

How to hide your lastname on Facebook 2013

Sunday, September 1, 2013 Posted by Glenn 0 comments

Article by: Glenn Posadas

Removing the Last Name of yours or hiding it on facebook seems quite impossible, right? Well I have learned this one technique that will let you do that freely.

Apparently, people in Indonesia doesn't have a last name. lol. Just my guess. Anyways, let us go to the purpose of this blog. REMOVING YOUR LAST NAME ON FACEBOOK!

proof: MY_PRIVATE_ACCOUNT

DISCLAIMER:
-I am not responsible if someone important is searching for you/your name on facebook.
-This method will surely make the searching query of facebook to find you.
-Note that you can only change your name on facebook THRICE!!!

STEPS:
1. Download this Google Chrome Browser Extension: CLICK HERE!


2. Install the Extension.
3. Go to Facebook. Click the gear icon and then go to ACCOUNT SETTINGS.
Select the Language and change it to BAHASA INDONESIA. Note that you can change it to English again later.


4. Now restart your browser. Close it. Open the Google Chrome again. Do you see the GEOPROXY you've downloaded and installed a while ago? It is located below the CLOSE,MIN.MAXIMIZE buttons.
5. Click it, Select Indonesia and then click SEARCH! Now you have to test each and every PROXY IPs given there. Select one, I recommend starting from the last IP :). After that, restart your browser again and see if you can connect to facebook. If you can, then you are successful!
6. If successful, go to Facebook, remove your Last Name, and then input your password and save changes.

Please do not forget to select GEOPROXY again and click DO NOT USE PROXY. Lastly, restart your browser.

additional tags: how to hide your surname on facebook, how to hide your family name on facebook 2013, how to, how to display only your first name on facebook, how to facebook 2013, facebook hack, facebook secrects, facebook indonesia.

Sharing is so Easy:
StumpleUpon DiggIt! Del.icio.us Blinklist Yahoo Furl Technorati Simpy Spurl Reddit Google Twitter FaceBook

Labels: , ,

Types of Encryption and Authentication for WiFi Routers

Sunday, August 18, 2013 Posted by Glenn 0 comments

Authentication

Open
With this setting enabled the AirStation does not require wireless LAN clients to authenticate. Anyone can connect to your wireless network.

WPA-PSK
Clients are authenticated in accordance with WPA (Wi-Fi Protected Access). A password ("PSK passphrase") is required to log into the wireless network.

WPA2-PSK
Clients are authenticated in accordance with WPA2 (IEEE802.11i). A password ("PSK passphrase") is required to log into the wireless network.

WPA/WPA2 mixedmode - PSK
This setting allows the authentication of WPA-PSK and WPA2-PSK clients at the same time. A password ("PSK passphrase") is required to log into the wireless network.


Encryption
Specify whether to encrypt wireless signals or not. If the different encryption types are used on the AirStation and the wireless client, they will not be able to communicate.

Open
The wireless signal is not encrypted. Because the contents of your communication may be intercepted, this choice is not recommended.
WEP
Encrypt wireless signal with WEP. WEP is a basic encryption standard for wireless LANs.
A WEP encryption key must be entered.
TKIP
TKIP is a more secure encryption than WEP. It is also slower. Wireless clients will need to support TKIP.
A WPA-PSK (Pre-shared key) must be entered.
AES
AES is even more secure than TKIP and faster than WEP. Highly recommended if your client devices support it.
A WPA-PSK (Pre-shared key) must be entered.
TKIP/AES mixedmode
The Mode supporting both TKIP and AES, can be selected only if [WPA/WPA2 mixedmode] is selected as Authentication.
"WPA-PSK (Pre-shared key)" must be inputted.


WEP Encryption Key
Enter WEP encryption key. The same encryption key must be entered into both the AirStation and the client device or there will be no communication between them.

Specifying the Encryption Method

There are two encryption key lengths (WEP64 and WEP128) for WEP. Effective bit length for encryption key is 40 bit in WEP64 and 104 bit in WEP128. Keys may be entered as either Hex or ASCII, for a total of 4 different ways of entering WEP keys. Default value of input method is "Character input,13 characters (WEP128)". When the input method is changed, encryption key values are cleared.
Character input, 5 character (WEP64)
Enter 5 (case sensitive) alphanumeric characters. Because a 5 character password is easy to crack, this type of key is not recommended.
Character input, 13 characters (WEP128)
Enter 13 (case sensitive) alphanumeric characters.
Hexadecimal number input, 10 digit (WEP64)
Enter a 10 digit HEX as an encryption key. You may use characters 0-9 and a-f. Because a 10 digit password is easy to crack, this type of key is not recommended.
Hexadecimal number input, 26 digit (WEP128)
Enter a 26 digit HEX as an encryption key. You may use characters 0-9 and a-f.

Specifying common keys for sending and receiving

Up to 4 encryption keys can be specified and one of them can be used for both encryption and decryption. (The others are only for decryption). You can select which is the common key for sending and receiving. Click the circle next to the input box of encryption key. Default common key for sending and receiving will be listed first after [Apply] is clicked.

Note
If a wireless LAN device doesn't support multiple encryption keys, it must be set to the common key for sending and receiving (the first key in the AirStation's list).

Key

The default value of the encryption key is blank. When you specify just one (or two, or three) encryption key(s), enter it into to just the 1st (or 1st and 2nd, or 1st, 2nd, and 3rd) box(es) and leave the other boxes blank.

WPA-PSK (Pre-Shared Key)
When TKIP or AES is used as encryption method, a WPA-PSK pre-shared key must be entered. If the same key is not entered into the AirStation and the wireless client, communication will not be established. Specify 8-63 alphanumeric characters or a 64 digit HEX. The default value is blank.

Rekey interval
When using TKIP or AES encryption, the encryption key is changed each "Key Renewal Period". This period can be configured from 0 to 1440 minutes. If 0 is set, the encryption key is not renewed. Default value is 60 minutes.


additional tags: encryption and authentication settings for wifi routers, buffalo router, buffalo help, help in wifi passwords, type of wifi passwords, type of wireless router authentication settings, what should I choose in wifi authentication, wifi encryption details, wifi router authentication and encryption help.

Sharing is so Easy:
StumpleUpon DiggIt! Del.icio.us Blinklist Yahoo Furl Technorati Simpy Spurl Reddit Google Twitter FaceBook

Labels: ,

Buffalo WiFi Router Configuration HELP

Posted by Glenn 0 comments

article by: Glenn Posadas

This post will guide you in setting up your Buffalo Wireless (WiFi) Router. All of the types of authentication and encryption that will be discussed here of course are the same with other brands of wireless/wifi routers. The only difference it is the way we will access the access point or the configuration site of our router.


1) The first thing you want to do is to connect to one of the SSIDs (known as WiFi connection) given by your buffalo router. The default names given by my buffalo router is the 2 SSIDs based on their MAC Address.

My laptop detected this WiFi name: 4CE676166600 
Anyone can connect to this network because in default, its authentication and encryption are open.

2) Second step: Open any browser you like. Type in the address bar this IP: 192.168.11.1 (note that it is for a buffalo wifi router. As I've said, only the encryption and authentication types discussed here will be the same with the other routers). So key in this, in the username field, type: root
small letters only and leave the password field blank, and then press enter.


3)  You will be directed to the Access Point settings of your router. Click Wireless Config > Basic(11n/g/b) / And follow the settings just like the photo given.

You can change the WiFi name. In my SSID1, I have renamed it to www.glennvon.com. In my SSID2, I have renamed it to WELOVEGOD. And so on upto SSID4.

Remember: don't forget to input your Password in the password field, below the encryption type.


So what you should choose in authentication type and in encryption type? CLICK HERE!
The article below discusses the settings in your wifi router.

Basic Wireless Setting(11n/g/b)
You can set basic configuration information for your wireless LAN manually here. If encryption is not used, communication will be established just by this basic setup. Encryption is highly recommended, however.

Wireless Radio
Un-checking "Enable" will disable wireless LAN functionality. When disabled, all wireless functionality, including broadcasting, is halted. Default value is enabled.

Wireless Channel
You may specify a channel (frequency band) for your wireless communication. If there are other wireless clients near the AirStation,you may get interference. Change to a different (and preferably non-overlapping) channel in this case. Available channels vary with which wireless standard you're using. When Auto channel is selected, a vacant channel is selected automatically. 11n/g/b : Auto, 1-11 Channel (Default value : Auto channel)

150Mbps Mode
Wireless communication commonly uses 20MHz per channel.
150Mbps Mode is a method to increase wireless transmission throughput to 40MHz per channel.
When 150Mbps Mode is used, the channel display on the wireless client is likely going to differ from the channel display on the AP.
The wireless client channel display may not display the Control Channel but the center frequency.
In this case, the channel between the Wireless Channel and the Extension Channel is displayed.

Example : When channel 3 is selected as Wireless Channel, and channel 7 is selected as the Extension Channel, channel 5 is displayed.

Band Width
You can select weather 20MHz or 40MHz (150Mbps Mode) are used for wireless communication.
Default value is 20MHz

Extension Channel
When 40MHz has been selected under Band Width, two channels are used. A Control Channel and an Extension Channel.
The Control Channel is specified by the [ Wireless Channel ] setting , and the Extension Channel is specified by the [ Extension Channel ] setting.

Broadcast SSID
Select whether to Enable Broadcast SSID or not.
Default value is "Allow".

Allow

When connecting to an AirStation broadcasting its SSID, wireless client devices do not need the SSID entered manually.
Broadcasting your SSID also lets clients detect the best wireless signal level available and connect to it automatically.

Disallow

To connect to an AirStation where SSID broadcast is disabled, the SSID of the AirStation will have to be manually entered on each wireless client device.
Even when "Automatic detection of wireless access point" ("Wireless Automatic Detection" on Client Manager) is selected, the client will not detect the AirStation unless it has special software installed.

Note:

While AOSS is in use, a Broadcast SSID can be set but will not be used.

SSID1
Wireless encryption WPA-PSK-TKIP, WPA2-PSK-TKIP , WPA/WPA2-Mixed or WEP is used for Multi Security SSID1.

SSID2
Wireless encryption WPA-PSK-TKIP or WPA/WPA2-Mixed is used for Multi Security SSID2.

SSID3
Wireless encryption WPA-PSK-AES is used for Multi Security SSID3.

SSID4
Wireless encryption WEP is used for Multi Security SSID4.

Separate feature
Connected wireless devices can communicate with WAN side devices if this setting is enabled.

SSID
SSID is an identifying name for a wireless network. Each access point has a SSID. Roaming can be allowed by setting multiple AirStations with the same SSID over a widespread area. To change SSID from the default value, select "Input Value" and enter a new SSID in the input box. Up to 32 alphanumeric characters may be used. SSIDs are case-sensitive.

Note:

While AOSS is in use, an SSID can be set but will not be used.


additional tags: help manual for buffalo wireless router, wifi router buffalo, buffalo configuration of wifi, WiFi configuration settings of buffalo router, help to config wifi passwords in buffalo router, Buffalo WCR-GN configuration, Buffalo WCR-GN wifi router help, Airstation settings, airstation buffalo router, Type of WiFi passwords, Authentication settings of buffalo.

Sharing is so Easy:
StumpleUpon DiggIt! Del.icio.us Blinklist Yahoo Furl Technorati Simpy Spurl Reddit Google Twitter FaceBook

Labels: ,

How to fix the Aero Theme in Windows

Wednesday, August 7, 2013 Posted by Glenn 0 comments

article by: Glenn Posadas

Having an aero theme is one of the good reasons in choosing windows 7 and 8 rather than its predecessors (e.g. vista, xp, etc...)

Anyways, you are here to fix your theme, right?
So, I have here my compilations of steps/solutions in solving your problem, not to mention my own solution.

Go ahead and continue reading this article...


Try one of these options:

1) In your desktop, right click and select PERSONALIZE. Under the "Aero Themes", select any of those themes, and later you can change the wallpaper if you want to. We just want to enable our aero power. XD

2) Click start, Right click MY COMPUTER then click PROPERTIES. And then Rate your computer. It may take some time to complete. If your computer is already rated, then try other options here.

3) Reinstall your Video Card Driver.

4) Check if your video card has no bloated caps, if there are some, replace them immediately (if you only have a knowledge in electronics, otherwise, seek some help).

5) If you have a stardock, then go to STARDOCK > MyColor > and then change the theme.

6) Uninstall an "ASUS-???" related software. Asus-?? means that I can't remember what is the exact name of that software that hinders your computer to be on aero theme.

7) Last, my final option, and probably the best option:
Go to Start. Type services.msc and then press Enter. Scroll down until you find the Desktop Window Manager Session Manager. Right click, and then click start.


If ever your service is already running, yet you are not experiencing the aero theme, right click again that service and click RESTART!!!
Voila! I am sure that one of these options worked for you! So hit like or share. :)

additional tags: how to fix the aero theme, how to aero, aero theme in windows disabled, how to enable the aero theme, no aero theme in windows 7, windows 8 no aero theme, how to enable my aero theme in windows, aero theme suddenly disappears, steps in solving and fixing the aero them in your windows.

Sharing is so Easy:
StumpleUpon DiggIt! Del.icio.us Blinklist Yahoo Furl Technorati Simpy Spurl Reddit Google Twitter FaceBook

Labels: ,

How to fix Prolific USB-to-Serial Comm Port

Thursday, July 25, 2013 Posted by Glenn 0 comments

Windows can't install your Prolific USB-to-Serial (converter). Okay, this is just easy to fix, but honestly it took me 15 minutes to figured out what was wrong. I already tried several versions of prolific drivers and other drivers for USB to RS232 converter made by other manufacturers.

Anyways, mine is made by Prolific. Prolific is the manufacturer, there are lots of USB-to-Serial RS232 converters out in the market that are not complicated to install.

Okay, getting straight, mine now is working! Kindly uninstall any prolific (non-working) drivers in your computer and then follow my instructions.

1. Download this file. CLICK HERE (my Google Drive Mirror)
2. Save the file in your Desktop (for easy access).
3. Click START >> Right click My Computer >> Click Properties >> Click Device Manager.
4. Click USB-Serial Controller, or under the Ports, please click Prolific USB-to-Serial
5. Click Update Driver
6. Click Browse and locate the folder that you've downloaded from my site.
7. Finally, let me know if this works for you :)

article by: Glenn Posadas


additional title: how to fix usb to rs232 prolific, prolific driver, real driver for prolific windows vista and windows 7 x86. Driver for prolific USB to rs232 windows 7 32bit. Cannot install driver for prolific usb to serial. Windows x64 driver for prolific usb to rs232 serial converter

Sharing is so Easy:
StumpleUpon DiggIt! Del.icio.us Blinklist Yahoo Furl Technorati Simpy Spurl Reddit Google Twitter FaceBook

Unidentified Network Appears in WiFi

Wednesday, June 26, 2013 Posted by Glenn 0 comments

article by: Glenn Posadas

A wild "Unidentified Network" appears in your face? Annoying unidentified network in your WiFi? Some of your desktop and laptops are already connected to your network as well as yo the internet, but one of your stupid laptop/desktop refuse to receive an I.P address?

Continue reading as I help you to fix this irritating issue...


There are actually many ways to solve this.

1. Disabling the ##ID_String... service in your services. Click here for more information. Cause I have already wrote an article about this.

2. Troubleshoot the problem using the windows troubleshooting tool. This somehow helps sometimes.

3. Installing Reliable Multicast Protocol in IPV4 and IPV6. This sometimes solve the problem for some people.

And lastly, my own way:

4. Assign a static IP Address on your IPv4.
Alright, so go to Network and Internet in your control panel > Network Connections > Right click your WiFi adapter.
After that, click the IPv4, Choose "use the following IP Address".
Assign your desired IP. Say, 192.168.1.69  (yeaaa, I love 69. Just kidding!)
Then the Subnet Mask will automatically be added. And then Click OK, don't mind the other textboxes.

Tadaaaaaaa! no internet connection yet, right? :) Haha! Because we are not yet done!
go to IPv4 again, and choose automatically assign IP Address. That should solve your problem!

Please share if it does so. :)

additional tags: Unidentified Network Notification, Unidentified Network in my Wifi even though it has internet, No connection in Wifi, Unidentified Network in Windows 7, how to fix it.

Sharing is so Easy:
StumpleUpon DiggIt! Del.icio.us Blinklist Yahoo Furl Technorati Simpy Spurl Reddit Google Twitter FaceBook

Labels: , ,

Solid Orange Color on Lan Port even without cable

Sunday, June 16, 2013 Posted by Glenn 0 comments

No internet access? But you are totally sure that all things are clear and set?
So here is the thing, most people would think (especially when there is a thunderstorm) that any NIC (or lan card) would just burn itself easily. When I saw that the port on the back of my computer produces a solid color orange even with or without cable, I thought that port was ughhh all gone, thought I should buy a new card. But, here is the way to determine if your card/NIC is broken:

First, go to myComputer, right click and then Properties.
Second, click DEVICE MANAGER.
Third, expand the Network Adapters. You can check there if really your adapter is not working or disabled.


Problem: IT SAYS IT IS WORKING PROPERLY, BUT STILL NO CABLE IS DETECTED.

Answer: Check if your adapter is disabled, if so, just enable it and then bam! All set!

article by: Glenn

additional tags: orange color in lan port what does it mean?, troubleshooting lan port 101, 101 with the nic card, no internet access in my pc, orange stable led in lan, no green color in computer, there is a wifi but no lan, troubleshooting internet connection

Sharing is so Easy:
StumpleUpon DiggIt! Del.icio.us Blinklist Yahoo Furl Technorati Simpy Spurl Reddit Google Twitter FaceBook

Labels: , ,

Uneditable Text in ComboBox VB.net

Tuesday, June 11, 2013 Posted by Glenn 0 comments


Article by: Glenn Posadas

If your program has a combo box and any user can edit or input something in such object, then your program may not look professional.

There are four types of combo boxes you may want to put in your form:

1. The Normal one - you can see the list inside the object but you can input anything. Not so cool, especially if you are developing a serious project.

2. Enabled/Disabled Combo Box - if you set the enable property to false, obviously you can't input anything, and you can't even click it.

3. DropDown Style Property Combo Box - if you set its dropdown style property to dropdown list, err, its color will be uneditable too and it can't have a text to display in running time. Also, I am currently developing a system for this coming june, it is for the registration in our organization, and I was having a real trouble in finding a solution in my combo box. I want it to look professional. I can't have this DropDown Style shit set to List, because its color is not good, and its obvious that its design doesn't fit to my form style.

4. The Normal but uneditable Combo Box - Finally! This is the best type of combo box that I can put in my program.The color is good and changeable and it is uneditable.

There are lots of ways to make your normal combo box uneditable. But I'm gonna show you the easiest one.

Okay here it is: Put e.Handled = True inside the KeyPress event of your Combo Box.

How to do this (noob haha),
1. Go to the Design Form.
2. Double click the Combo Box
3. Click at the middle field of the code (SelectedIndexChanged), and
4. Select the method name above (this has the thunder sign) and find KeyPress, finally put the code I've given above.


additional tags: uneditable text in combobox in visual c#, visual basic.net, vs 2005, read only combo box, how to disable edit in combo box, how to make combo box uneditable without dropdown list, no dropdown list, readonly

Sharing is so Easy:
StumpleUpon DiggIt! Del.icio.us Blinklist Yahoo Furl Technorati Simpy Spurl Reddit Google Twitter FaceBook

Labels: , ,

Nokia X2 White Display FIXED

Monday, April 1, 2013 Posted by Glenn 0 comments

For most of the cellphone technicians, from newbies to pros, nokia phones are easy to fix. Anyway, my aunt always told me to try to fix the cellphone of her daughter (nokia x2) since I am repairing their computer, again.

So I saw her phone, and it only displays a white display, but it turns on, how did I know? Simple, some of the nokia phones vibrate when you turn them on. (oooh turn on huh?! hehe)....

I tried to seek help from forums but most of them suggest that it is a hardware issue, anyway, I asked my cousin if she accidentally dropped her phone, she said yes. XD. So, enough of this talk, and I will share my solution.

If you only accidentally dropped your phone, try this:
1. Turn you cellphone on, you will see of course a white display and it will suddenly vibrate, meaning your phone is totally fine.
2. Tap the back of your phone.
3. Do this for 10 times if it doesn't work. Trust me :) It won't damage your phone as far as I know. ^___^ Anyway, do this at your own risk!!!

additional tags: Nokia x2 fixed white display, nokia x2 displays only white display, white display in nokia x2, how to fix nokia x2, nokia x2 white display problem, nokia x2 lcd display, lcd displays only white in nokia x2.

Sharing is so Easy:
StumpleUpon DiggIt! Del.icio.us Blinklist Yahoo Furl Technorati Simpy Spurl Reddit Google Twitter FaceBook

Labels: ,

Hack for Speeding Up Taskbar Previews

Monday, March 4, 2013 Posted by Glenn 0 comments

When you roll over taskbar icons in Windows Vista and in Windows 7, little previews appear. The standard delay time for these previews if 400 ms (milliseconds, quite fast), or just under half a second. If this is too slow or too fast for you, of course you can adjust such delay time with an easy Registry Hack.

1. Open the Registry Editor and go to HKEY_CURRENT_USER > Software > Micorosoft > Windows > CurrentVersion > Explorer > Advanced.

note: to open registry editor, go to START>RUN> and enter "REGEDIT" without quotes.

2. Right-click on the right pane and click NEW > DWORD (32-bit) value. Name the new DWORD "ExtendedUIHoverTime".

3. Double-click on ExtendedUIHoverTime to open it. Under "Base", click Decimal and then enter in the delay time (in milliseconds) in the "value data" filed. Click OK to set the time (default is 400 milliseconds).

4. Log off and then log back in for the change to take effect.

so that is it!
Stay tune for other Registry Hacks to make your PC Faster.
Yum yum! XD

additional tags: Registry hacks, 6 registry hacks by sarah jacobsson Purewal, original article from srah jp, free registry hacks, how to hack your registry, make windows faster, windows 7 hacks, windows vista hacks, registry hacks for windows, windows 7 registry hacks, make your windows vista faster

Sharing is so Easy:
StumpleUpon DiggIt! Del.icio.us Blinklist Yahoo Furl Technorati Simpy Spurl Reddit Google Twitter FaceBook

Labels: , ,

Free Internet for Android Smart Phones TM, GLOBE, and SMART

Friday, December 7, 2012 Posted by Glenn 77 comments

I've been searching kung paano magkaroon ng free internet sa android. Ayos naman ang proxy address, ilang beses ko na binago yun. port 8080 at port chuva chuva e not effective. Buti pa girlfriend ko na symbian Nokia N8 e may free net. Kainggit. Dati nung may symbian nokia phone pa ako, free lagi internet ko at unli download ng symbian & java games.

Anyway, I found out that a MODIFIED OPERA MINI is necessary. Hindi basta basta opera mini na officially released sa android market. This app is modified for android free internet. bina-bypass ata nito yung mga chuva chenes na mahirap iexplain. Gamit ang proxy ip address (used for hiding your real ip address), at tamang ports sa phone mo, may free net ka na.

First Step:


credits: dzebb, winaru.

Then install sa phone.
Basta android phone ha? if hindi android phone mo, try to find an app para sa phone mo. Kung meron para sa IOS, edi swerte ka. Kung hanap mo e pang java at symbian, marami dyan, nagkalat sa net.

Second Step:
This one is important, so sundan maigi.
1. Settings
2.Wireless and network settings
3. Mobile Networks
4. CHECK the "use packet data" option. (this could drain your battery faster. Sa symbian at java OS phones, such phones will always ask the user if they would like to use packet data para hindi laging nakaopen, thus reducing the battery consuming chuvaa.)

5. Go to "Access Point Names"
6. If wala kang APN, Create a new APN. Otherwise, touch your desired APN to be edited. Sakin "MyGlobeConnect".

7. Kung Globe or TM ka, ito ang settings:

Name: MyGlobeConnect
APN: www.globe.com.ph
Proxy: 203.177.42.214 (You can choose any proxy address given by the other blogs or forums if you want.)
Port: 8080
Server: socket://server4.operamini.com:8080/   (this is optional, I suppose. But ilagay nyo na din to be sure).
Authentication Type: PAP or CHAP or none
APN Type: internet

for SMART users, try this nalang: 

change the APN to "mms"
and proxy to: 10.102.61.46

additional tags: free internet access for android, internet verywehere and anywhere, free mobile internet, 100% tested free internet access for mobile phones, java and symbian free internet using opera mini, opera mini serves as a medium for free internet for android, android phones and mobiles free internet access, globe hack free internet access for android mobile phones, android mobile phones Touch Mobile free internet access, free internet access for TNT and smart users,.

Sharing is so Easy:
StumpleUpon DiggIt! Del.icio.us Blinklist Yahoo Furl Technorati Simpy Spurl Reddit Google Twitter FaceBook

Labels: , ,

Paano Paibigin ang mga babae?

Sunday, November 25, 2012 Posted by Glenn 0 comments

January 31, 2012: nasa loob kami ng classroom. Wala si ma'am. Wala ang maganda naming professor. So busy ang lahat. Ang mga babae busy sa kadadaldal siyempre, yes, we know na madaldal talaga ang mga babae, in fact, sila nga po dahilan kung bakit maingay ang room namin e. haha. Ok, so going on, wala ngang professor, nanonood ang kaklase kong si levisthor ng anime. Hindi ko alam kung bakit kami napunta sa porn video. wew. Oh walang kinalaman ang pornography sa kung paano paibigin ang mga babae ha? So nagpakita siya ng isang video, walang kwenta.

Next paragraph para hindi kayo maboring sa pag-babasa. Napunta kami sa sex video ni Super Crush Idol ko na si "Maricar Reyes". Ha? Tinatanong mo kung anong part ng sex video nya? ahhh, yung sa sofa. haha. So banas na banas si levisthor kay hayden K.

Ako: "E baka kasi mag-boyfriend-girlfriend sila ni maricar dati?"
Levs: "oo nga".
Ako: "Normal na yun sa mag-boyfriend-girlfriend".
Levs: "May video?" -- hindi sakto sa nasabi nya :)
Sabi ko sa sarili ko: kapag mag-asawa kayo o mag-long time bf/gf, papayag certainly yung girlfriend o wife ng isang babae na gumawa sila ng sex video. Why? Kasi they trust their partners. They feel safe. They are so confident na hindi kakalat yung video.

Aw. sobra na itong na-bblog ko. mukhang delikado. @_@. Tinatamad na tuloy ako.

Sabi pa ni levs: "alam mo kung sino boyfriend ngayon ni maricar?"
Ako: "Sino?"
levs: "richard poon?"

Nagtanong pa ako kung siya ba yung nasa ASAP. oo daw.
Ito na, relevant na itong susunod dun sa title ng blog post ko.

sabi ko: "kung ako kay richard poon, tapos napanood ko na binaboy yung gf ko, potek grrr!!!".
Matino and quotable yung sinabi ni levs na sumunod:
levs: "Kaya mahal na mahal ni maricar bf niya kasi tinanggap siya".

Sa isip ko ulit, oo nga ano? Tinanggap ni Richard Poon ng buong buo ang super crush ko. Huhuh. Nakaka-touch. Galing ni levs!

So ito talaga ang point:

1. Mapapa-ibig mo ang isang babae kapag nalaman niya na tinaggap mo siya ng buo, despite sa mga nakaraan niya. Sa mga negative past experiences ng isang babae, dapat nating tabunan yun ng mga positive experiences :) And iparamdam natin na hindi na nila mararanasan muli yung sakit at pait ng mga naramdaman nila noon.

2. Mapapa-ibig mo ang isang babae kapag naparamdam mo sakanya na kaya mo siyang ipagtanggol sa lahat. Tingnan mo yung picture sa itaas, yung babae, she seems so secured, we know she feels so much security from her partner. Note: this only applies sa mga lalaki! Strictly sa opposite sex, and not sa mga lesbians lol! Kanina nga pala sabi sakin ni master dabeh, sarap daw sapakin ng mga tomboy. hahaha. Tomohhh!!! Nakakita kasi kami ng tomboy na nakakandong sa girlfriend niya dun sa school. wew.

3. Mapapa-ibig mo ang isang babae kapag naramdaman niyang sincere ka sakanya. Kapag nalaman niya at naramdaman niya na pinagmamalaki mo siya, na mahal na mahal mo siya. Na kaya mong iwan ang lahat para sakanya, such as bisyo, your comfort zone. Heh. kagaguhan po yung sa sobrang mahal mo ang isang tao, kaya mong iwan pamilya mo ng wala sa tamang lugar o oras. Kagaguhan po yung mag-live in kayo ng wala sa oras o lugar. Kagaguhan po yung magtatanan kayo. Sang-ayon dyan ang mahal kong girlfriend <3 p="">
Now, kung meron kayong nais idagdag kung paano paibigin ang mga babae, comment below, edit ko ito sometime. :)

[note: may last post ako last 2 years ata or whatever about kung paano pakiligin ang babae? napaka-walang kwenta po nun. kasi bata pa ako nung na-post ko yun sa blog ko :) hehehe ]


additional tags: paano?, paano pakiligin ang mga babae?, paano pasagutin ang mga babae?, paano ligawan ang isang babae? paano paiibigin ang isang chix? paano magiging komportable sayo ang isang babae? paano ba nya ako mamahalin? 

Sharing is so Easy:
StumpleUpon DiggIt! Del.icio.us Blinklist Yahoo Furl Technorati Simpy Spurl Reddit Google Twitter FaceBook

Labels: ,

Free Zone by Google

Wednesday, November 7, 2012 Posted by Glenn 1 comments

Katatapos lang ng exams, grabe!!! Finals na! And malas lang! Hindi na gumagana yung free internet. Dami kasing nagbabasa ng post ko about sa android free internet, e kahit medyo busy pa din although tapos na nga ang exams, eto pinipilit ko maghanap ng ways, madalian lang ito. sana gumana sa inyo ha? Una kasi, VPN - wala na din to, mabilis and maganda sana kaso wala na. Sumunod yung bugged sim, kaso hindi din ata gumagana e. I find it hard na makapag-register, ewan, pero as soon as magawa ko, siyempre isshare ko agad dito. But for now, may isa pang way, super free ito. Delete nyo na yung opera mini nyo na re-programmed. Gagamit tayo ng default internet browser ng phone natin. Default GPRS settings din, meaning no port and proxy address.


GLOBE just announced another free offering from them, called Free Zone . It is Google-powered free zone that lets users have access to Google services on their mobile devices for free! Not all wants avery much complex and technical explanation to this, solet me explain it the easy way.

Simply, its a free access for us that is under GLOBE or TM prepaid subscriptions. We can use Google services namely; Google Search, GMail, and Google Plus.
It is a tied-up partnership of GLOBE and Google. Just like what we’ve already seen with SUN and Facebook with the successful and popular Facebook Zero.
Globe and Google got this Free Zone for us.
GLOBE said that:
Free Zone powered by Google™ works on your phone’s default browsers. Third party browsers such as Opera Mini, QQ, Bolt and other third party browsers are not supported.


To enjoy Free Zone, you need a Google account. To get started on accessing Google™ mobile services for free, just text LIBRE to 8888 or visit libre.ph using your phone’s default browser. Promo is open to all Globe Prepaid and TM subscribers until Mar. 31, 2013 .

How to use Free Zone on Globe/TM

I only had tried to use this with my Android phone and a TM sim. Sending an SMS to 8888 with text “LIBRE” will just give you out an explanation on how to do this.


On your mobile’s default browser, go to http://libre.ph/

Be sure you have a working connection. I just used myGlobe INET with APN: http.globe.com.ph and blank port/blank IP for my connection.

You will then be redirected to freezone.google.com

Log-in with your Google account.

and Enjoy :p

Still, this is a pretty nifty service that might be of help for those emergency google searches you might need to do. Free access to your mail is also nice.

ps: credits to iwhelDc78


additional tags: alternatives for bug sim, free internet for globe and tm no bugs, real free internet for symbian, android free internet, real free internet no proxy for globe, globe and tm natural free internet, no bugs and no proxy address and no vpn free internet.

Sharing is so Easy:
StumpleUpon DiggIt! Del.icio.us Blinklist Yahoo Furl Technorati Simpy Spurl Reddit Google Twitter FaceBook

Labels: , ,

How to know your Motherboard Brand?

Wednesday, October 31, 2012 Posted by Glenn 0 comments

Hi guys, I just re-formatted my Desktop's Hard Drive and I intentionally installed a windows XP service pack 3 operating system. Unfortunately, I've spend more than 12 hours before I completely installed all the softwares I usually need and use in my desktop. Anyways, you will always have to install your drivers when you choose windows xp(whether if it is sp1, sp2 or sp3) as your operating system, unlike windows 7 or windows vista, they will always know and automatically install all your drivers.

So, how did I manage to install my drivers? I lost my CD Driver, I don't know what is the name of my motherboard, I just know that my mobo is an ASUS. Luckily, I found this great software.

It is the BELRAC ADVISOR.

Just install such software and run it. :) It will open your default browser and will output all of the information you need from your computer.


article by: GLENN POSADAS

additional tags: Belrac Advisor, Using Belrac Adviser, How to use belrac Advisor, Belrac Software, how to know the name of your mobo, mobo name, mobo name get, get your motherboard name, downlaod drivers for your motherboard, mobo drivers, how to know the drivers of your mobo, how to know the drivers of your motherboard.

Sharing is so Easy:
StumpleUpon DiggIt! Del.icio.us Blinklist Yahoo Furl Technorati Simpy Spurl Reddit Google Twitter FaceBook

Labels: ,

How to block Game Requests on Facebook

Sunday, October 28, 2012 Posted by Glenn 0 comments

Article by: Glenn Posadas
Yes Finally! I have found my own solution on how to stop those stupid infuriating game requests from my stupid friends on facebook.
Seriously, if you can't unfriend them just to avoid game requests, just follow these two simple steps.

Ooh by the way, DEAR STUPID GAMER-FRIENDS ON FACEBOOK, I HATE YOU ALL! COULD YOU PLEASE, AS IN PLEASE JUST PLAY ON YOUR OWN!!! I WON'T PLAY YOUR STUPID GAMES!!! YOU ALWAYS SEND ME BALDERDASH REQUESTS!!! THANK YOU!


FIRST STEP:

FIND YOUR GAME REQUESTS FROM YOUR NOTIFICATIONS AND CLICK THE CROSS OR CLOSE BUTTON BY HOVERING YOUR MOUSE/CURSOR TO SUCH NOTIFICATION AND THE CLOSE BUTTON WILL JUST APPEAR! (note: I don't need a relationship. I already have. Someone dumb joined me in such group.)

SECOND/LAST STEP:


FINALLY, CLICK THE TURN OFF! VOILA!!! OR IF YOU WANT, CLICK THE REPORT AS A SPAM!


additional tags: How to block Game Requests on Facebook; how to fuck those who send you game requests on facebook? How to kill those stupid people who play games and invite you on facebook? How to block stupid game requests on facebook, how to stop notifications about game requests on facebook?

Sharing is so Easy:
StumpleUpon DiggIt! Del.icio.us Blinklist Yahoo Furl Technorati Simpy Spurl Reddit Google Twitter FaceBook

Labels:

Remove Virus in USB part 2

Friday, October 26, 2012 Posted by Glenn 1 comments

This article is written by me. I originally posted this on teachmeonline.co.cc :)

Remove Virus in USB part 2

This is for noob in computer, so I bet you will get it easily.

Instructions:
1.Insert your USB (if you think your USB has no virus at all, we will use that to check if you are correct)

2. Click START>RUN> type CMD and press ENTER.

CMD


3. Third step is.. find where is your USB located.
find where your USB located(whether D, E or F, or G)
4. Success? Now proceed to fourth step. Go back to CMD which you opened in step 2. Kindly type where your usb located. For example, the photo in step 3 shows that my USB name GLENN is at G. So I type in my cmd G:
Then press ENTER. After the location of your USB, please type attrib and press ENTER.
I typed G:>attrib

5. Alright! fifth step. After you enter the attrib, the hidden/not hidden files will appear in the CMD. suppose the virus or malicious file is the mash.exe(that is my dota hotkey heheh).
As you can see in side of each file is the letter A. Some files has A S H R. Ok, we aim to delete the mash.exe file which has a letter A.
Type attrib -"letter of the file" "file name with extension file" and press ENTER.
I typed here in this photo attrib -a mash.exe
This will make the file visible and ready to delete.

Lastly, we will now delete such file by typing del mash.exe


suppose the virus or malicious file is the mash.exe(that is my dota hotkey heheh)
Okay! Now we are finished to delete my file mash.exe(huhuhuh). To double check whether that file is already deleted or not, just type again the attrib

Voila! It is now 4:28AM and I got no sleep yet.

additional tags: Removal of viruses in usb part 2; removal of viruses in usb, removal of virus and spywares in usb, usb removal program, usb remove virus, virus removal in universal serial bus, remove viruses in usb in easy way

Sharing is so Easy:
StumpleUpon DiggIt! Del.icio.us Blinklist Yahoo Furl Technorati Simpy Spurl Reddit Google Twitter FaceBook

Blogger Posts No thumbnails on Facebook

Thursday, October 25, 2012 Posted by Glenn 2 comments


Article by: Glenn Posadas

So, you as well have been struggling because of this stupid problem? I've searched many times on google, clicked on the next page 3 times, and then... UGH!!! No Solution yet!

Anyway, I thank God because finally, I found my solution. Yep! I myself discovered this answer. HAHA!

The debugger on facebook didn't work for me. I don't know how to use that shit.

https://developers.facebook.com/tools/debug

So, really, what did I do to make everything alright?
I just simple cleared out and corrected my meta-tags.

Go to Blogger, Edit your HTML. Click Proceed.


Find this code


Now, Just RIGHT AFTER such code
Note: replace 

DESCRIPTION HERE:Write your blog description
KEYWORDS:Write the keywords of your blog
AUTHOR NAME:Write the author's name(Your name) 


Then Try to make a new blog post and then paste its url on facebook. See the magic happen! :)


additional tags: Blogger Posts No thumbnails on Facebook; Real Solution for Blogger, Blogger Solution No thumbnails, no thumbnails?, Real solution for Blogger Problem, Blogger Problem no thumbnails on facebook, Facebook shows no thumbnails

Sharing is so Easy:
StumpleUpon DiggIt! Del.icio.us Blinklist Yahoo Furl Technorati Simpy Spurl Reddit Google Twitter FaceBook

Labels: , ,

How to make Home made Caesar Salad in few easy steps

Saturday, September 8, 2012 Posted by Glenn 0 comments

Uhmm, I had a quarrel with my ex-friend stupid gay, so I made this caesar salad. lol. What's the point? It doesn't make sense. lololol.

Anyway, I love caesar salad, especially the caesar salad of pizza hut.
so here are the ingredients:
(note: Im not an HRM student or graduate. XD. I am a computer engineering student, and this is my first time, so make no fun of me. hehe)

1. Lettuce - of course. :) Here in the Philippines, you can find it in any branch of SM supermarket. Price ranges from 30 to 50 pesos.

2. Caesar Salad Dressing - if you can make one, then that's cool. But since my budget is tight, as always, I usually buy a ready-made caesar salad dressing.

optional:

3. Bacon
4. Cheese - any kind of cheese. :)
5. toasted bread - cubes, I prefer.

so, if you already have these ingredients, I bet you can already make your caesar salad even if you stop reading from here.


annnnnnnddddddddddddd... we're done! :)
FINALLY: ))))


additional tags: How to make Home made Caesar Salad in few easy steps, make caesar salad at home, at home caesar salad, how to make easy caesar salad, caesar salad, diy caesar salad, caesar salad on budget, budget caesar salad

Sharing is so Easy:
StumpleUpon DiggIt! Del.icio.us Blinklist Yahoo Furl Technorati Simpy Spurl Reddit Google Twitter FaceBook

Labels: ,